How to Add Custom CSS in Shopify The Right Way
Adding custom CSS, or even a custom CSS file to Shopify may seem like a daunting task, but overall it’s an easy task with endless opportunities to tweak and customize a Shopify theme.
Shopify provides an outstanding platform to really build a solid eCommerce business, but it also gives you the power to customize and edit CSS, thus creating an aesthetically pleasing store. However, with all that flexibility at your fingertips, you do need to pay close attention to the most common pitfalls, especially with paid Shopify themes.
Even with the best premium Shopify themes, you may void your warranty, or rather developer support if you choose to edit the CSS file. Not to mention, if you're awarded a free theme upgrade your CSS changes will may be transferred to the upgrade.
If you’re happy knowing that you may not get support and before you proceed, ensure you’ve duplicated your Shopify theme - a theme backup.
Always, work on the duplicated theme. You’ll be able to preview changes, and when the time is right, you simply make the duplicated theme the primary theme - the version in which users can browse.
It’s worth pointing out that your chosen theme may have the functionality already. So before editing any CSS file, ensure you cannot perform the same task in the theme editor.
Most importantly, keep your CSS clean. A clean codebase is a happy codebase.
If adding or editing CSS becomes too challenging you can opt to post a question on the Shopify Community forum or outsource. Be sure to choose an outsourcing platform where your money is protected.
 Upwork
To reiterate:
- DO perform a backup
- DO preview changes on the backup
- DO test before publishing changes
- DO check if the theme editor does not contain the functionality
- DON’T assume you’ll still have developer support when making changes to a commercial theme
- DON’T add inline CSS - it clutters the markup
- DON’T add CSS to the head of the page
Now that we’ve covered the Do’s and Don’ts of adding CSS to your Shopify store, below we’ll demonstrate the steps to add and edit CSS in Shopify. With additional steps to demonstrate how to add a CSS file.
Shopify tutorials:
- How to change collection URL in Shopify
- How to add a product to Shopify the right way
- How to create a drop-down menu in Shopify
- How to create a collection in Shopify
- How to add a blog to Shopify
- How to add meta tags to Shopify
- How to remove powered by Shopify
- How to add users to Shopify
- How to add a logo to Shopify
- How to edit the order confirmation email in Shopify
- How to turn off the Shopify abandoned cart email
- How to hide products on Shopify
- How to duplicate your Shopify theme
Again, and before moving on we’re going to assume that you’ve duplicated your Shopify theme and that you’re aware that we’re going to be working on the duplicated version.
How to Edit Existing CSS in Shopify
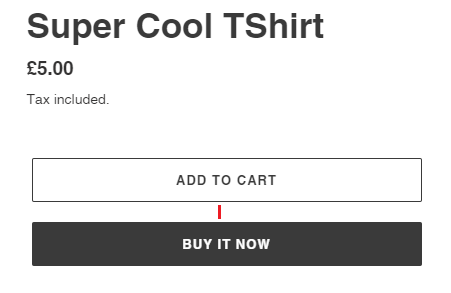
In the hypothetical sense, the UX team has approached us to say that 12% of our Shopify users are struggling with the "buy now" button. Users seem to be accidentally clicking the "add to cart" button due to the lack of whitespace between the buttons.
Our goal in the below example is to increase the space between the "add to cart" button and the "buy it now" button on the product pages using CSS.
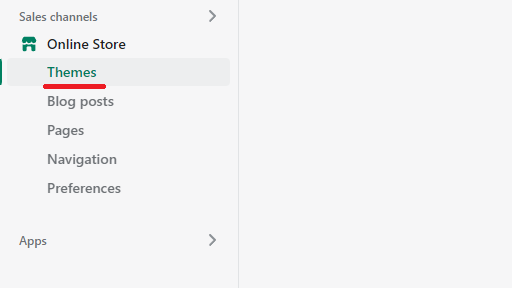
Step 1: Online Store > Themes
Go to online store and then themes
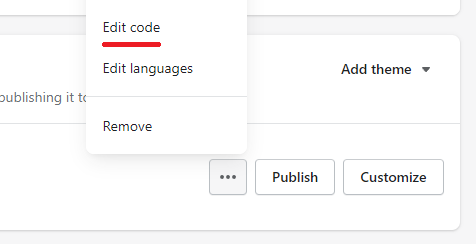
Step 2: Edit Code
Locate and click "edit code" on the duplicated theme
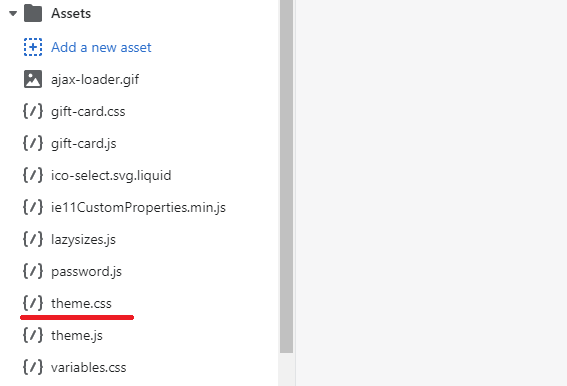
Step 3: Theme.css
Locate and click the "theme.css" file.
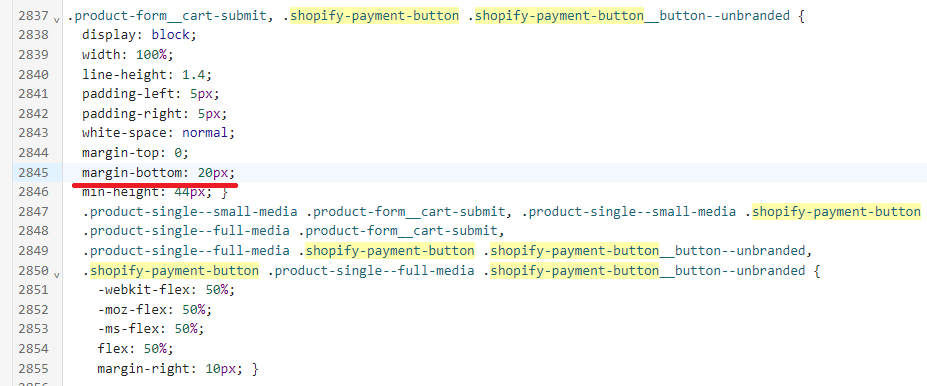
Step 4: Edit CSS
With the open CSS file, we're going to locate the existing element CSS rule and increase the bottom margin by 10px - from 10px to 20px.
Step 5: Preview
When editing a global css, or any CSS for that matter, mistakes happen, you have to make sure you're happy with the results, and the CSS does not adversely affect, or conflict with any other styles.
Life is a little more stress free, if you've backed up your theme, and you're working within the backup.
The above demonstrated how to edit existing CSS, but now we want to look at how to add custom CSS to an existing stylesheet.
How to Add Custom CSS in Shopify
Theme CSS can be complicated and difficult to digest, but adding custom CSS that acts as an override is acceptable in the right context. However, you really should take the time to understand the structure and hierarchy.
In this example, we'll add custom CSS to an existing HTML element to the theme.css file.
Custom CSS
Here we've added a width to the container using a new class added to the product description HTML element:
- Class: "kanteneo-product-override" added to the product description element found on the product-template.liquid file
- CSS rule consisting of a single property - "width:75%;"


Adding custom CSS to an existing CSS file is fine to some degree, but it can get a little messy. So on the next step we'll cover how to add custom HTML, a new CSS file, and CSS rules.
How to Add a CSS file in Shopify
If you've it made this far, congratulations!
This step is a little more involved, but it's a relatively straightforward process. So we're going to look at how to add a CSS file in Shopify with HTML with styles!
The typical use case would be that you've added HTML to a page, or a section that needs some form of styling.
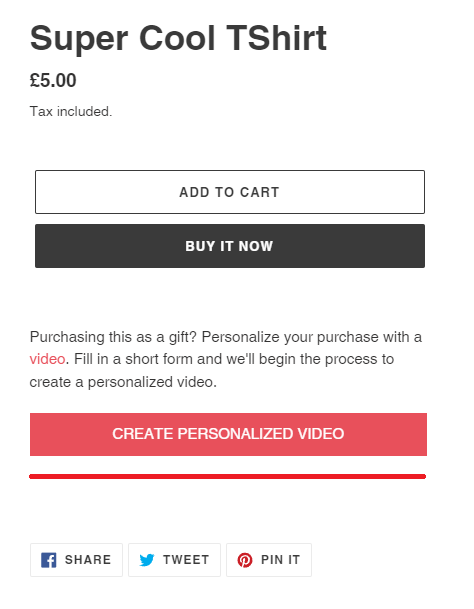
For the purpose of the demo we've added a "P" tag - paragraph, a nested "span" tag, and a nested "ahref" tag to the product page, this will be a generic paragraph across all products.

Our new HTML needs a little "spice", we need to ensure that it's a focal point - I.E the users eyes are drawn to a CTA.
Ideally, and to understand an end-to-end process you should phyically follow the steps. Don't worry though! you should be working on your duplicated theme and you have the ability to delete all changes.
Step 1: Custom HTML
To truly understand what it means to add a CSS file, we need to add HTML right? We certainly don't want create a bunch of overrides, or pollute the theme.css file.
The mission is to extend, not modify.
In a user-story fashion, and hypothetically. A store owner needs the ability to offer a personalization service - A button that directs the user to an external, or internal page that collects data about the intention of the purchase.
If the intention of the purchase is a gift purchase, we want the user to click a button - again, hypothetically speaking.
Go to your product-template.liquid file and add the following HTML below your buy now, and/or add to cart buttons:
<p class="kanteneo-cta">Purchasing this as a gift? Personalize your purchase with a <span>video</span>.
	Fill in a short form and we'll begin the process to create a personalized video.
	<a href="https://kanteneo.com" title="Create Personalized Video" target="_blank">Create Personalized Video</a>
</p>
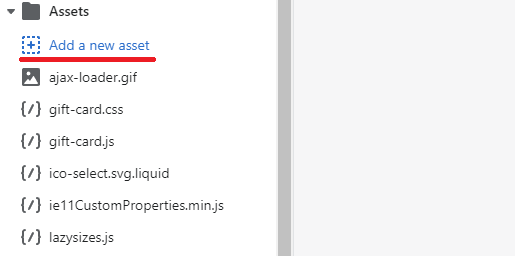
Step 2: Assets
Within the theme code editor, navigate to the assets and folder and click "Add a new asset".
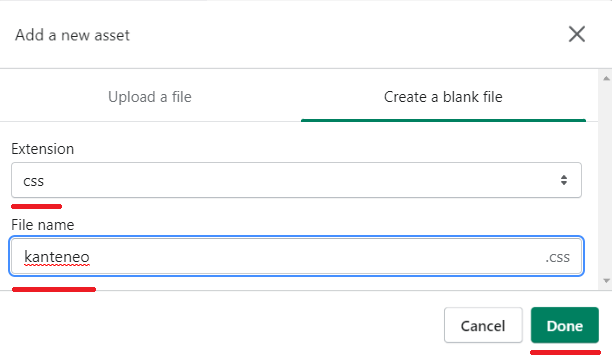
Step 3: Upload or Create a CSS File
After clicking add new asset you'll be prompted to upload an existing css file, or create a new one.
For this demo, we'll create a new blank CSS file.
Step 4: Add CSS Rules
Open the new CSS file, if not open already, and copy and paste the following CSS rules.
p.kanteneo-cta{
  width:75%;
}
p.kanteneo-cta span{
    color:#e8505b;
}
p.kanteneo-cta a{
    display:block;
    padding:10px;
    color:#ffffff;
    background-color:#e8505b;
    text-align:center;
    margin-top:20px;
    text-transform: uppercase;
}
p.kanteneo-cta a:hover{
    color:#ffffff;
}
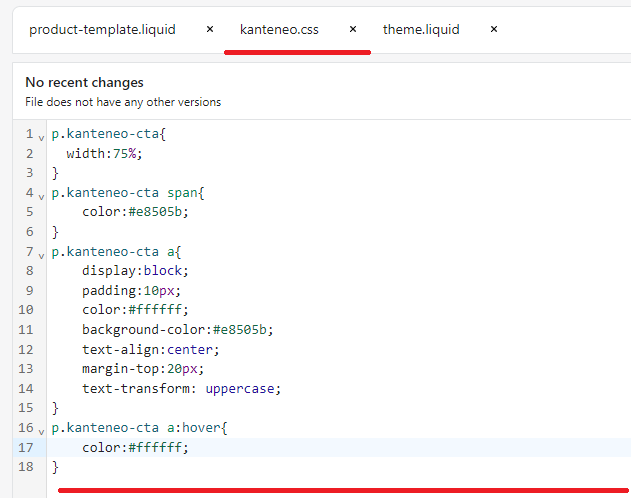
Don't forget to save!
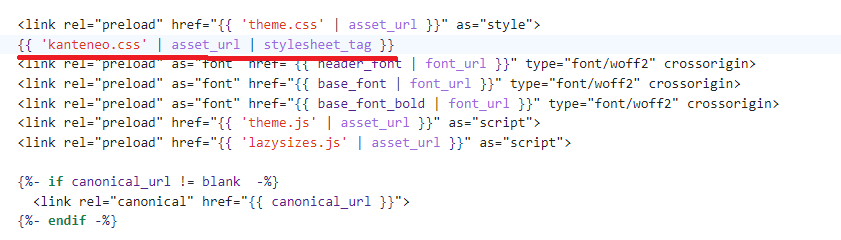
Step 5: Reference the CSS
Great, we've added our CSS rules and HTML but the theme does not know that the CSS file exists yet, so therefore cannot render any styles.
On this step we'll need to reference the new CSS file in the head section in the theme.liquid file.
As this is a new CSS file with potential overrides, we'll need to conform to the hierarchy. Add the following code below the last CSS reference entry.
{{ 'kanteneo.css' | asset_url | stylesheet_tag }}
Replace "kanteneo.css" if you decided to use a different name for the CSS file.
Don't forget to save!
Step 6: Preview
If all has gone well, you should now see the custom HTML, and CSS rules applied to the HTML via the new CSS file.
The clean up: If you've followed through with all tutorials, then you may have unwanted HTML/CSS. Traverse through the steps and delete.
The Takeaway
Having the ability to customize CSS is a blessing and a curse. Changing global CSS within your Shopify store can cause immense damage to your theme design. Everyone makes mistakes right?
Don’t forget to take all necessary steps to prevent damage, and don't obfuscate the design and user journey.
If the idea of changing the CSS becomes too much of a technical challenge, don’t be afraid to outsource. With thousands, upon thousands of Shopify experts around the world, you can be sure to find the right talent.
With the likes, of the Shopify Community, Upwork, and Freelancer, you have plenty to choose from, but as with anything in life, always perform a vetting process. Due diligence will only protect you from malicious and scrupulous scammers.
To summarize we've briefly covered:
- How to edit existing CSS in Shopify
- How to add custom CSS in Shopify
- How to add a CSS file in Shopify
What next:
- How to increase Shopify traffic
- Learn why you have Shopify traffic but no sales
- The best customer retention strategies to increase revenue
- How to blog for business
- The Best Shopify Themes
- Share this post, every little helps.
- Subscribe to our newsletter below for tips and tricks to help boost sales.
Additional Shopify Resources
With Shopify being one of the largest eCommerce platforms on the market means you’ll never be short of resources to learn how to build a profitable eCommerce business.
Kanteneo aims to be the best Shopify blog on the market, but you may require additional resources to help you on that journey. Below we’ve listed a top-selling Shopify book by Veronica Jeans to help you learn how to launch a profitable business.


