How to Add Meta Tags to Shopify
Adding meta tags to your Shopify store in many respects has already been done for you, in the form of “edit SEO fields”. The SEO fields can be found on the homepage, collections, products, and custom pages.
However, the need may arise to add a custom meta tag to Shopify, this could be Google verification, Schema.org, or many others.
Adding a custom meta tag requires manually editing the theme.liquid file. Adding to the theme.liquid file ensures that a meta tag is detected site-wide.
Related blog posts:
- Why is my Shopify store not showing up on Google?
- Why is image alt tag SEO important?
- Best Shopify SEO Apps
- How to change your domain name on Shopify
- How to upload a sitemap to Shopify
- How to add a product to Shopify the right way
- How to change collection URL in Shopify
- How to create a drop-down menu in Shopify
- How to create a collection in Shopify
- How to add a blog to Shopify
- How to remove powered by Shopify
- How to add users to Shopify
- How to add a logo to Shopify
- How to edit the order confirmation email in Shopify
- How to turn off the Shopify abandoned cart email
- How to hide products on Shopify
- How to add custom CSS in Shopify
- How to add an order fulfillment center to Shopify
- How to create a custom section in Shopify
- How to add notes in Shopify
- Shopify pricing plans - A Guide to Shopify Fees
- What is Shopify?
- What is MyShopify?
Before moving on, let’s understand how updating the SEO fields affect meta tags through a step process.
Do SEO Fields in Shopify Create Meta Tags?
Yes, SEO fields update the value in Meta Titles, Meta Descriptions, and URL. When you change the text on the SEO fields, the value is used to update the meta tags.
The SEO fields can be found on each resource:
- Pages
- Collections
- Products
- Blogs
- Home page
- Contact page
- + More
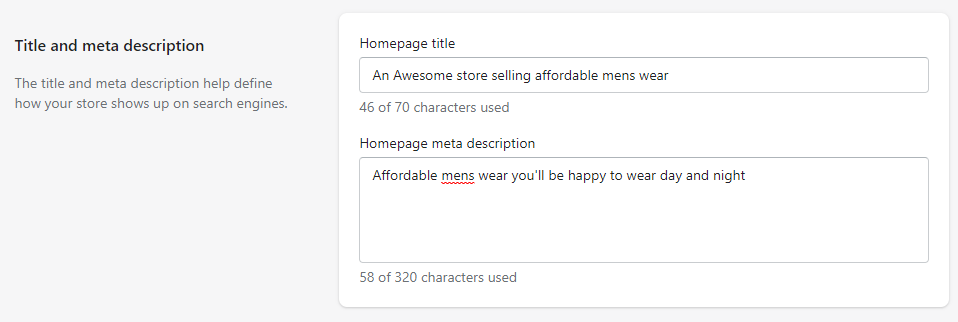
Let’s take a look at the Shopify home page as an example. We’ll update the meta title, and meta description.
Updating Meta Tags on the Shopify Homepage
Step 2: Homepage Meta Title and Meta Description
Locate and add values to the Meta Title and Meta Description text fields.

Step 3: Confirm Meta Title by Browser Tab
The simplest process to confirm the changes are added to the meta title, is simply visiting your store and confirming you can see the text on your browser tab title.

Step 4: Technical Confirmation
To confirm changes to meta title and meta description outside of viewing the tab title, is opening the browser dev tools, or viewing the source code.

Updating Meta titles, and meta descriptions across collections, products, blogs, and pages is a very similar process. Each resource has an option to edit the SEO fields, and these fields directly impact Meta Title, Meta Description, and the URL.
Swiftly moving on, let's take a look at how to add a meta tag to the code base.
How to Add a Meta Tag to Shopify
Step 1: Online Store > Themes
Go to online store, then themes.

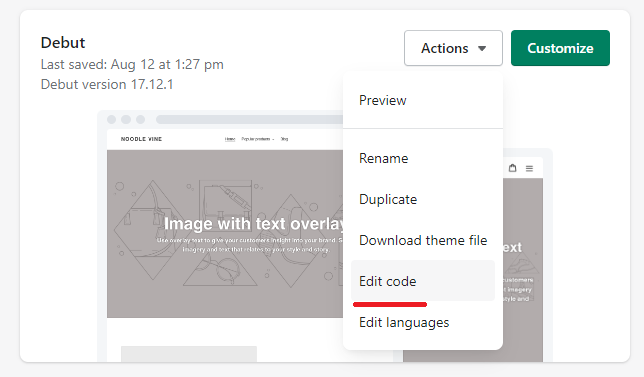
Step 2: Edit Code
On the themes page, click "actions", then "Edit code".

Step 3: Locate Theme.liquid
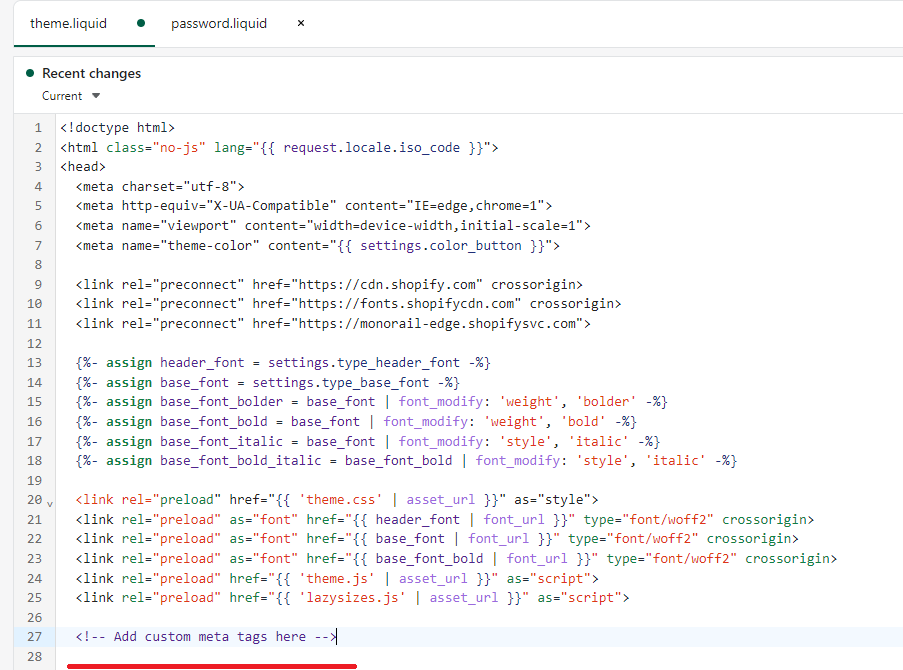
Locate and click the theme.liquid file.

Step 4: Add Meta Tag
In this example we'll add an HTML comment, but you'll want to add your meta tag.
Before saving, or committing to making any changes, it's a good idea to backup your theme first:
If you've made changes to your theme, don't forget to click save!

Step 5: Confirmation
Always confirm your changes.
In this example we're just checking to see if our HTML comment is visible. Open the browser dev tools, or view the source code to confirm.

List of Important Meta Tags
- Viewport Meta Tag: Indicates how to render a page, and is generally used for responsive layouts
- Charset Meta Tag: The character encoding of your Shopify store
- Canonical Meta Tag: To tell search engines you are the original author
- Title Tag: The name of your page
- Meta Description Tag: The description of your page
- Robots Meta Tag: To tell search engines to index your site/page
- Nofollow: To tell search engines to follow outbound links or not
- Twitter cards Meta Tags: Used for Twitter to render titles, descriptions, and images to display as a rich snippet
- Open Graph Meta Tags: Used for social media platforms to render titles, descriptions, and images to display as rich a snippet
- Author Meta Tag: Typically for content pages, but to tell search engines you are the author
The Takeaway
Adding meta tags is extremely important when adding resources(pages) to Shopify, not to mention when you need to verify your store with search engines, then it becomes a necessary process to understand.
When done correctly search engines will be able to read and display the content accordingly in the SERPS. Ensure to spend the time to understand why meta tags are important.
To summarize we've briefly covered:
- How SEO fields in Shopify create meta tags
- How to add a meta tag to Shopify
- List of Important Meta Tags
What next:
- Learn how to increase Shopify traffic
- Free Shopify apps
- Shopify traffic but no sales?
- Check out the Best Shopify apps for SEO
- Share this post, every little helps.
- Subscribe to our newsletter below for tips and tricks to help boost sales.
Retailers also searched for:
- Meta tags Shopify
Additional Shopify Resources
With Shopify being one of the largest eCommerce platforms on the market means you’ll never be short of resources to learn how to build a profitable eCommerce business.
Kanteneo aims to be the best Shopify blog on the market, but you may require additional resources to help you on that journey. Below we’ve listed a top-selling Shopify book by Veronica Jeans to help you learn how to launch a profitable business.


